Stopping WordPress Comment Spam Before It Starts

My blog isn’t terribly popular but I do have a good number of links to my plugins which has made me a more visible target for comment spammers. The built-in WordPress spam filter does a pretty good job but it does nothing to stop bots from hammering my blog and eating up bandwith. One of my friends in my extended blog network had a post that tipped me off to a more active method of spam prevention, Bad Behavior.

Bad Behavior works by analyzing the HTTP requests made by clients and running them through a set of tests like checking the user agent description. Before installing the script I was receiving about 200 spam comments per day and maybe 1 or 2 would slip through per week. Now I’ll get maybe 1 a day in my spam queue. Not sure how much this affects the bandwith the spammers are using but it will definetely save a little on database.

GameSpy’s PC Game Awards

GameSpy has their annual awards up for PC games and being that I pretty much exclusively play PC games I found it pretty interesting. It also gave me a few ideas of games to pick up next year on the cheap. I’ve played 1,2,5,6 and will definitely try 3 and 4. Company of Heroes is awesome, best strategy game since Starcraft, just hope they get the online stuff running smoother. Here’s their top 10:

1. Company of Heroes
2. The Elder Scrolls IV: Oblivion
3. Half-Life 2: Episode One
4. Space Rangers 2: Rise of the Dominators
5. Neverwinter Nights 2
6. Galactic Civilizations II: Dread Lords
7. Warhammer 40,000: Dawn of War — Dark Crusade
8. Dreamfall: The Longest Journey
9. GTR 2
10. LEGO Star Wars II: The Original Trilogy

See the full list here.

2005 Toyota Tacoma Stereo Upgrade – Aftermarket Head Unit Install with Auxiliary input for iPod/MP3 player

UPDATE 10/11/2010: This stereo got stolen a couple months ago and I’ve replaced it with a JVC KD-R810. I wrote a new post about that installation process with more detailed instructions and new after pictures: My 2nd Toyota Tacoma Stereo Install

The Tacoma’s stock receiver does not have an auxiliary input and there’s no way I was going down the FM transmitter route so it was time for a head unit upgrade. Here’s a quick look at my installation of an aftermarket stereo/radio/cd player and auxiliary input for an mp3 player, Ipod or any other audio playing device in my Tacoma. The install isn’t too bad so if you want to breath new life into your Tacoma’s stereo on the cheap then this is a great little project.

Dash Kit Info: I got the Scosche TA2052B Single Din from Amazon, there’s also a double DIN version.

Head Unit Info: I got a Pioneer DEH-P4800MP, but it is discontinued now which is too bad since the finish matches the dash kit almost exactly. I keep looking, but haven’t found anything with as good of a color match.

If you want to buy new, these Pioneer units have a bit of the lighter silver color and have received good reviews: Pioneer DEH-P5000UB , Pioneer DEHP4100UB, Pioneer DEH2100IB.

This is the stock stereo I had to work with. The trend has been towards completely integrating the stereo into a car’s dash, it looks great but as soon as you want to install an aftermarket stereo in you might be stuck. The aftermarket dash kit is color matched to the silver around the vents.

Stock stereo in 2005 Toyota Tacoma

Step 1 – Rip out climate control, unbolt and remove dash and stereo, unhook everything.

Rip out the stereo and connected trim

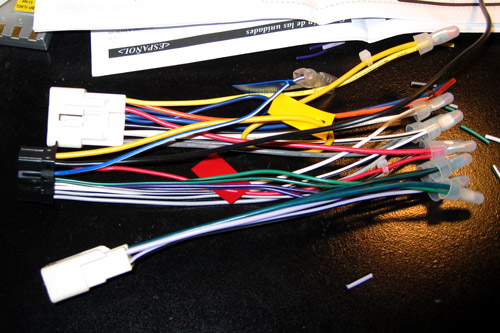
Step 2 – Wire up the wire harness so you don’t have to cut any of the factory wiring.

Wire harness all ready to go

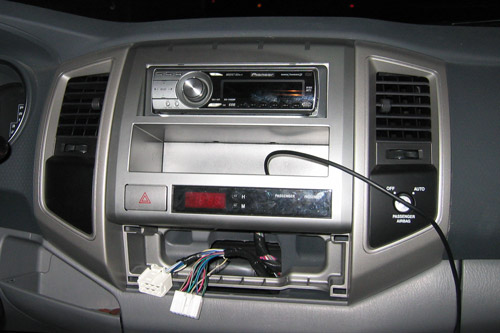
Step 3 – Hookup stereo and test to make sure everything works before putting the whole thing back together.

Testing before putting it back together

Step 4 – I’ve got everything in and just need to stick the climate control panel back on. Getting the head unit and hazards/clock panel into the replacement dash was the most time consuming part of the whole project. First I couldn’t get the hazards panel out of the stock dash but managed to pry it out after an hour. Secondly, the installation instructions for the dash kit were pretty brief, I guess you can consider a diagram and a few unintelligible sentences instructions. At this point I had also drilled a hole in the back of the pocket to feed the cable for the auxiliary input through.

Almost done

Finish – With everything put back together I actually like the look of the replacement dash kit more than the original bumpy texture.

Finally done with the install

Audio quality is much better after a little EQ’ing and I can now hook up an Mp3 player. New speakers would be a nice upgrade, but the new head unit really helps the stock speakers come alive.

Not a terribly difficult project and I’m glad I did it myself instead of paying an installer a good chunk of change to do it. I probably got lucky since most dashes aren’t this accessible and easy to work with.

DIY HD Tivo

Well not exactly like Tivo, but close enough. I had gotten tired of trying to tape shows or download them after they had showed and I wanted a better way to do things. Being the practical person I am (it also helps that I’m cheap) I decided to turn my computer into a High Definition Personal Video Recorder (HDPVR). I had been watching shows on my computer for a while and thought why not make the process easier and get better quality at the same time. Tivo would be nice but I’d rather not have to pay a monthly fee to get full functionality and I’m looking towards the future and an HD tv.

I decided on pulling down over the air (OTA) high definition because I don’t want to pay for TV and 90% of the shows I care to watch are broadcast for free. Next I bought a HD tuner card, VBOX DTA-150 ATSC HDTV receiver, and ran coax from our rooftop antenna to my room. The funny thing is you don’t need a special antenna to get HD signals but they’d probably try to sell you an “HDTV” antenna at one of the big box stores. I hooked up the 20-30 year old antenna on our roof and it works great.

Next I had to decide what software to run to manage and schedule all of my recordings and playback them back. I started off with GBPVR, open source, and it worked ok but I just wasn’t very satisfied and had to fuss with it. I looked at the commercial offerings, I didn’t want Microsoft Media Center so I tried the trial of BeyondTV. Wow, what a difference and the nicest thing about it is that it works great with minimal configuration. Trial was only for 21 days and it was reasonably priced, but they were throwing in a decent Firefly RF remote for free for a limited time so I bit and ordered it.

In this process I also found out that an hour of uncompressed HD video can take up about 6-8 GB on the hard drive so I had to order a new 250 GB Western Digital SATA drive to expand my 160 GB storage capacity to about 400 GB.

So I pretty much have all the functionality of Tivo for a fraction of the price, considering the new HD Tivo they just released is well over $600, plus the monthly $13.

Blog facelift

Things were getting a little old around the blog so I spruced things up a bit. Ditched the nav bar across the top, it was a bit of a pain to work with. Put login stuff in the sidebar like Nathan has on the Blarg, RSS buttons down at the bottom (which you should use, if you don’t know how or why please ask) and a thing for my flickr account. There should be more changes and more posts coming.