My 2nd Toyota Tacoma Aftermarket Stereo Upgrade

The first stereo I put in my 2005 Tacoma got stolen this summer so it was time to do it all over again. It was a lot easier this time since I wasn’t starting with the stock stereo still installed, but it’s a fairly easy project either way.

Shopping List

Head Unit: Last time I bought a Pioneer unit and liked it, but this time around I was looking for more features, especially built in Bluetooth. I narrowed my choice down to the JVC KD-R810 because it had Bluetooth and good iPod support along with customizable backlight colors. One of the preset colors matched the rest of dash exactly. You can read my full review of it here.

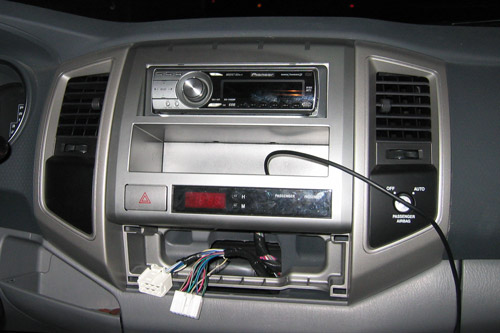
Dash Kit: The Scosche kit is pretty nice and matches the flat silver color on my 2005 SR5 Access Cab almost exactly. I prefer it to the stock stereo which has the textured silver. I chose to run the Bluetooth microphone and the rear USB connector through the back of the dash kit’s pocket. There’s a plastic support piece that screws onto the back of the pocket and it covers up nearly the whole thing. I was able to drill two 1/2″ holes right next to each on each side to feed through the mic and USB. There’s just enough room with the support piece on for the cables themselves and covers up the bulk of the holes. You can kind of see this in the picture below.

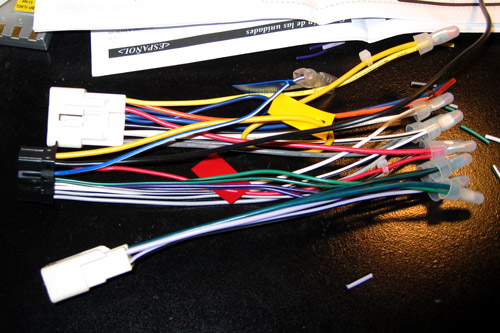
Wiring Harness: The wiring harness is a must. Not only does it make installation go quicker, but it avoids having to cut the factory harness off. The wire color on the harness and the stereo are standardized so you just have to match them up and crimp. You can solder them, but either way works just fine. I found joint pliers were the easiest to get a good crimp with.

Final Results: I’m much happier with the install this time. My old stereo matched the color of the dash, but it had white text and green backlighting. I think I prefer the JVC and its black/silver front with matching lighting.

Installation Process

  1. Pop out climate control panel with a screwdriver
  2. Unbolt stereo from dash, 4 total behind the climate control panel (exact head size of bolts eludes me)
  3. Pop the whole stereo out, it’s held on by little clips
  4. Unconnect everything and bring the stereo inside
  5. Transfer the little yellow clips onto the dash kit
  6. Transfer the clock and hazards assembly to the dash kit (kind of a pain to get out)
  7. Wire up the harness to your new stereo, twist matching wires together, stick them in a crimp cap and give a good squeeze with pliers (give them a tug to make sure they’re in there tight)
  8. Drill any holes you might want in the pocket
  9. Install stereo in kit, but be careful not to scrape the mouth of it, the metal sleeve will take paint off
  10. The metal sleeve around the stereo has little tabs, bend those up along the back of the face to help lock it in
  11. Hook the stereo up and test it (having a second set of hands will help here)
  12. Connect the hazards and clock harness
  13. Once everything looks good, bolt the dash kit back on
  14. Snap climate control panel back into place

Breaking down my gasoline consumption

With gas prices at their current levels people are hurting at the pump and even my 2.5 mile commute adds up. I usually go home for lunch so I’m driving 10 miles a day. Compared to the 50 miles I was doing one year ago I should be grateful my gas bill is as low as it is. The savings I’ve seen with a shorter commute aren’t quite as large as you’d think. The increased price of gas and lower mileage from city driving has doubled my cost per mile.

Gas prices have gone up considerably; here’s my data I’m collected over the past 2.5 years:
Price of Gas

Higher prices mean it costs more to drive a mile, no question there. Here’s my mileage over that same time period for my 2005 Toyota Tacoma 4 cylinder automatic:
MPG

When I started at the County last August two things happened: a tank of gas started lasting longer and my mileage plummeted. The short trip to and from work means my engine is operating at a less efficient temperature for a larger proportion of my commute. Coupled with stopping and idling at traffic lights I saw a 7-8 mpg decrease, that’s a very significant ~30% drop in mileage. My historic cost per mile looks like this:
Cost per mile

The double whammy of increased prices and lower mileage hurts. With my current cost per mile it costs me $2.20 to drive to work everyday. Doesn’t seem like much, but that adds up to about $550 per year. That’s just to get to work, that doesn’t include driving anywhere fun.

I’m going to go through a series of post analyzing my energy costs and figuring out ways to reduce them. What’s your daily commute cost you? Simple formula to calculate it:

Commute cost = (price of gas / MPG) * miles

2005 Toyota Tacoma Stereo Upgrade – Aftermarket Head Unit Install with Auxiliary input for iPod/MP3 player

UPDATE 10/11/2010: This stereo got stolen a couple months ago and I’ve replaced it with a JVC KD-R810. I wrote a new post about that installation process with more detailed instructions and new after pictures: My 2nd Toyota Tacoma Stereo Install

The Tacoma’s stock receiver does not have an auxiliary input and there’s no way I was going down the FM transmitter route so it was time for a head unit upgrade. Here’s a quick look at my installation of an aftermarket stereo/radio/cd player and auxiliary input for an mp3 player, Ipod or any other audio playing device in my Tacoma. The install isn’t too bad so if you want to breath new life into your Tacoma’s stereo on the cheap then this is a great little project.

Dash Kit Info: I got the Scosche TA2052B Single Din from Amazon, there’s also a double DIN version.

Head Unit Info: I got a Pioneer DEH-P4800MP, but it is discontinued now which is too bad since the finish matches the dash kit almost exactly. I keep looking, but haven’t found anything with as good of a color match.

If you want to buy new, these Pioneer units have a bit of the lighter silver color and have received good reviews: Pioneer DEH-P5000UB , Pioneer DEHP4100UB, Pioneer DEH2100IB.

This is the stock stereo I had to work with. The trend has been towards completely integrating the stereo into a car’s dash, it looks great but as soon as you want to install an aftermarket stereo in you might be stuck. The aftermarket dash kit is color matched to the silver around the vents.

Stock stereo in 2005 Toyota Tacoma

Step 1 – Rip out climate control, unbolt and remove dash and stereo, unhook everything.

Rip out the stereo and connected trim

Step 2 – Wire up the wire harness so you don’t have to cut any of the factory wiring.

Wire harness all ready to go

Step 3 – Hookup stereo and test to make sure everything works before putting the whole thing back together.

Testing before putting it back together

Step 4 – I’ve got everything in and just need to stick the climate control panel back on. Getting the head unit and hazards/clock panel into the replacement dash was the most time consuming part of the whole project. First I couldn’t get the hazards panel out of the stock dash but managed to pry it out after an hour. Secondly, the installation instructions for the dash kit were pretty brief, I guess you can consider a diagram and a few unintelligible sentences instructions. At this point I had also drilled a hole in the back of the pocket to feed the cable for the auxiliary input through.

Almost done

Finish – With everything put back together I actually like the look of the replacement dash kit more than the original bumpy texture.

Finally done with the install

Audio quality is much better after a little EQ’ing and I can now hook up an Mp3 player. New speakers would be a nice upgrade, but the new head unit really helps the stock speakers come alive.

Not a terribly difficult project and I’m glad I did it myself instead of paying an installer a good chunk of change to do it. I probably got lucky since most dashes aren’t this accessible and easy to work with.